
Qualtrics is a sophisticated experience management platform that specializes in survey creation and data analysis. By examining responses from customer satisfaction surveys, feedback forms, and market research surveys, Qualtrics can uncover key customer insights, preferences, and trends.
Welcome to the Qualtrics documentation for Dashbot! Integrating Dashbot into your Qualtrics application is quick and easy.
If you have any questions, comments, or suggestions, please feel free to contact us.
Set Up Qualtrics API Access
Create an API Token in Qualtrics:
- Log into your Qualtrics account.
- Navigat to the 'Account Settings' and create an API token.
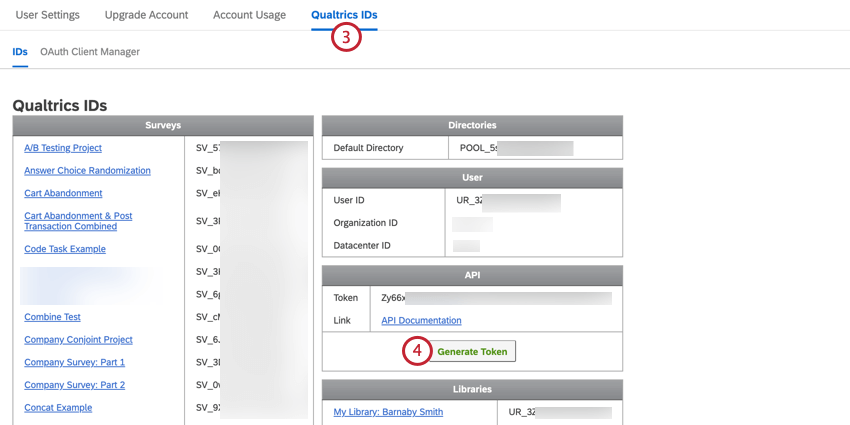
- Note down your
API TokenandData Center ID. - See here for more detail
Fetch Survey Responses from Qualtrics
Set Up GET Request:
https://yourdatacenterid.qualtrics.com/API/v3/surveys/{surveyId}/responses
These are the necessary Headers:
X-API-TOKEN:{YourAPIToken}- Replace
{YourDataCenterId}with your Data Center ID and{surveyId}with the ID of the survey. - Send the request to get the survey responses.
POST responses to Dashbot
When your survey receives a response, post the data to the following endpoint:
https://tracker.dashbot.io/track?platform=universal&v=10.1.1-rest&type=incoming&apiKey=API_KEY_HERE
Make sure to set the ‘Content-Type’ header to ‘application/json’ and to replace API_KEY_HERE with your api key.
You must send the data with the following fields:
- text – string – (required)
- userId – string – (required) – should be the SAME userId for both incoming and outgoing messages this is NOT the bot’s user ID
To review all optional fields see our API reference.
The data to POST should pass the following data:
{
  "text": "Hi, bot",
  "userId": "+14155551234",
  "platformJson": {
    "whateverJson": "any JSON specific to your platform can be stored here"
  }
}
Sample cURL
curl -X POST -H "Content-Type: application/json"
     -d '{"text":"Hi, bot","userId":"+14155551234","platformJson":{"whateverJson":"any JSON specific to your platform can be stored here"}}'
     'https://tracker.dashbot.io/track?platform=sms&v=11.1.0-rest&type=incoming&apiKey=API_KEY'
Notice, you must replace the placeholder API_KEY_HERE above with your api key.
NPM Integration with Node.js
Steps
-
Set Up Node.js Project:
- Initialize a new Node.js project:
npm init. - Install required packages:
npm install axios dotenv.
- Initialize a new Node.js project:
-
Environment Setup:
-
Create a
.envfile in your project directory. -
Add your Qualtrics API token and Survey ID:
makefileCopy code
QUALTRICS_TOKEN=yourAPIToken
SURVEY_ID=yourSurveyId
-
-
Retrieve Data from Qualtrics:
-
Create
index.jsand set up Axios for API requests. -
Fetch survey responses using Qualtrics API:
javascriptCopy code
require('dotenv').config();
const axios = require('axios');

const qualtricsApi = axios.create({
  baseURL: 'https://yourdatacenterid.qualtrics.com/API/v3/',
  headers: { 'Authorization': `Bearer ${process.env.QUALTRICS_TOKEN}` }
});

const getSurveyResponses = async () => {
  try {
    const response = await qualtricsApi.get(`surveys/${process.env.SURVEY_ID}/responses`);
    return response.data;
  } catch (error) {
    console.error('Error fetching survey responses:', error);
  }
};

getSurveyResponses().then(data => console.log(data));
-
-
Send Data to Dashbot:
-
Extend the script to send data to Dashbot.
-
Add Axios configuration for Dashbot API:
javascriptCopy code
const DASHBOT_API_KEY = 'yourDashbotApiKey';
const dashbotApi = axios.create({
  baseURL: 'https://tracker.dashbot.io/track',
  params: { type: 'generic', apiKey: DASHBOT_API_KEY }
});

const sendDataToDashbot = async (data) => {
  try {
    await dashbotApi.post('', { text: data });
    console.log('Data sent to Dashbot');
  } catch (error) {
    console.error('Error sending data to Dashbot:', error);
  }
};

// Example usage
getSurveyResponses().then(data => sendDataToDashbot(data));
-
-
Run and Test:
- Execute your script:
node index.js. - Check Dashbot to confirm data reception.
- Execute your script: