
Ada CX is a customer service chatbot platform that enables businesses to create AI-powered chatbots for seamless customer interactions.
Welcome to the ADA documentation for Dashbot! Integrating Dashbot into your ADA application is quick and easy.
Obtain ADA API Key
Before you can retrieve data from ADA, you need to have an ADA API key, which allows you to authenticate your requests. For further details you can hop into the ADA documentation here
In the Ada dashboard, go to Settings > Integrations > API Integrations.
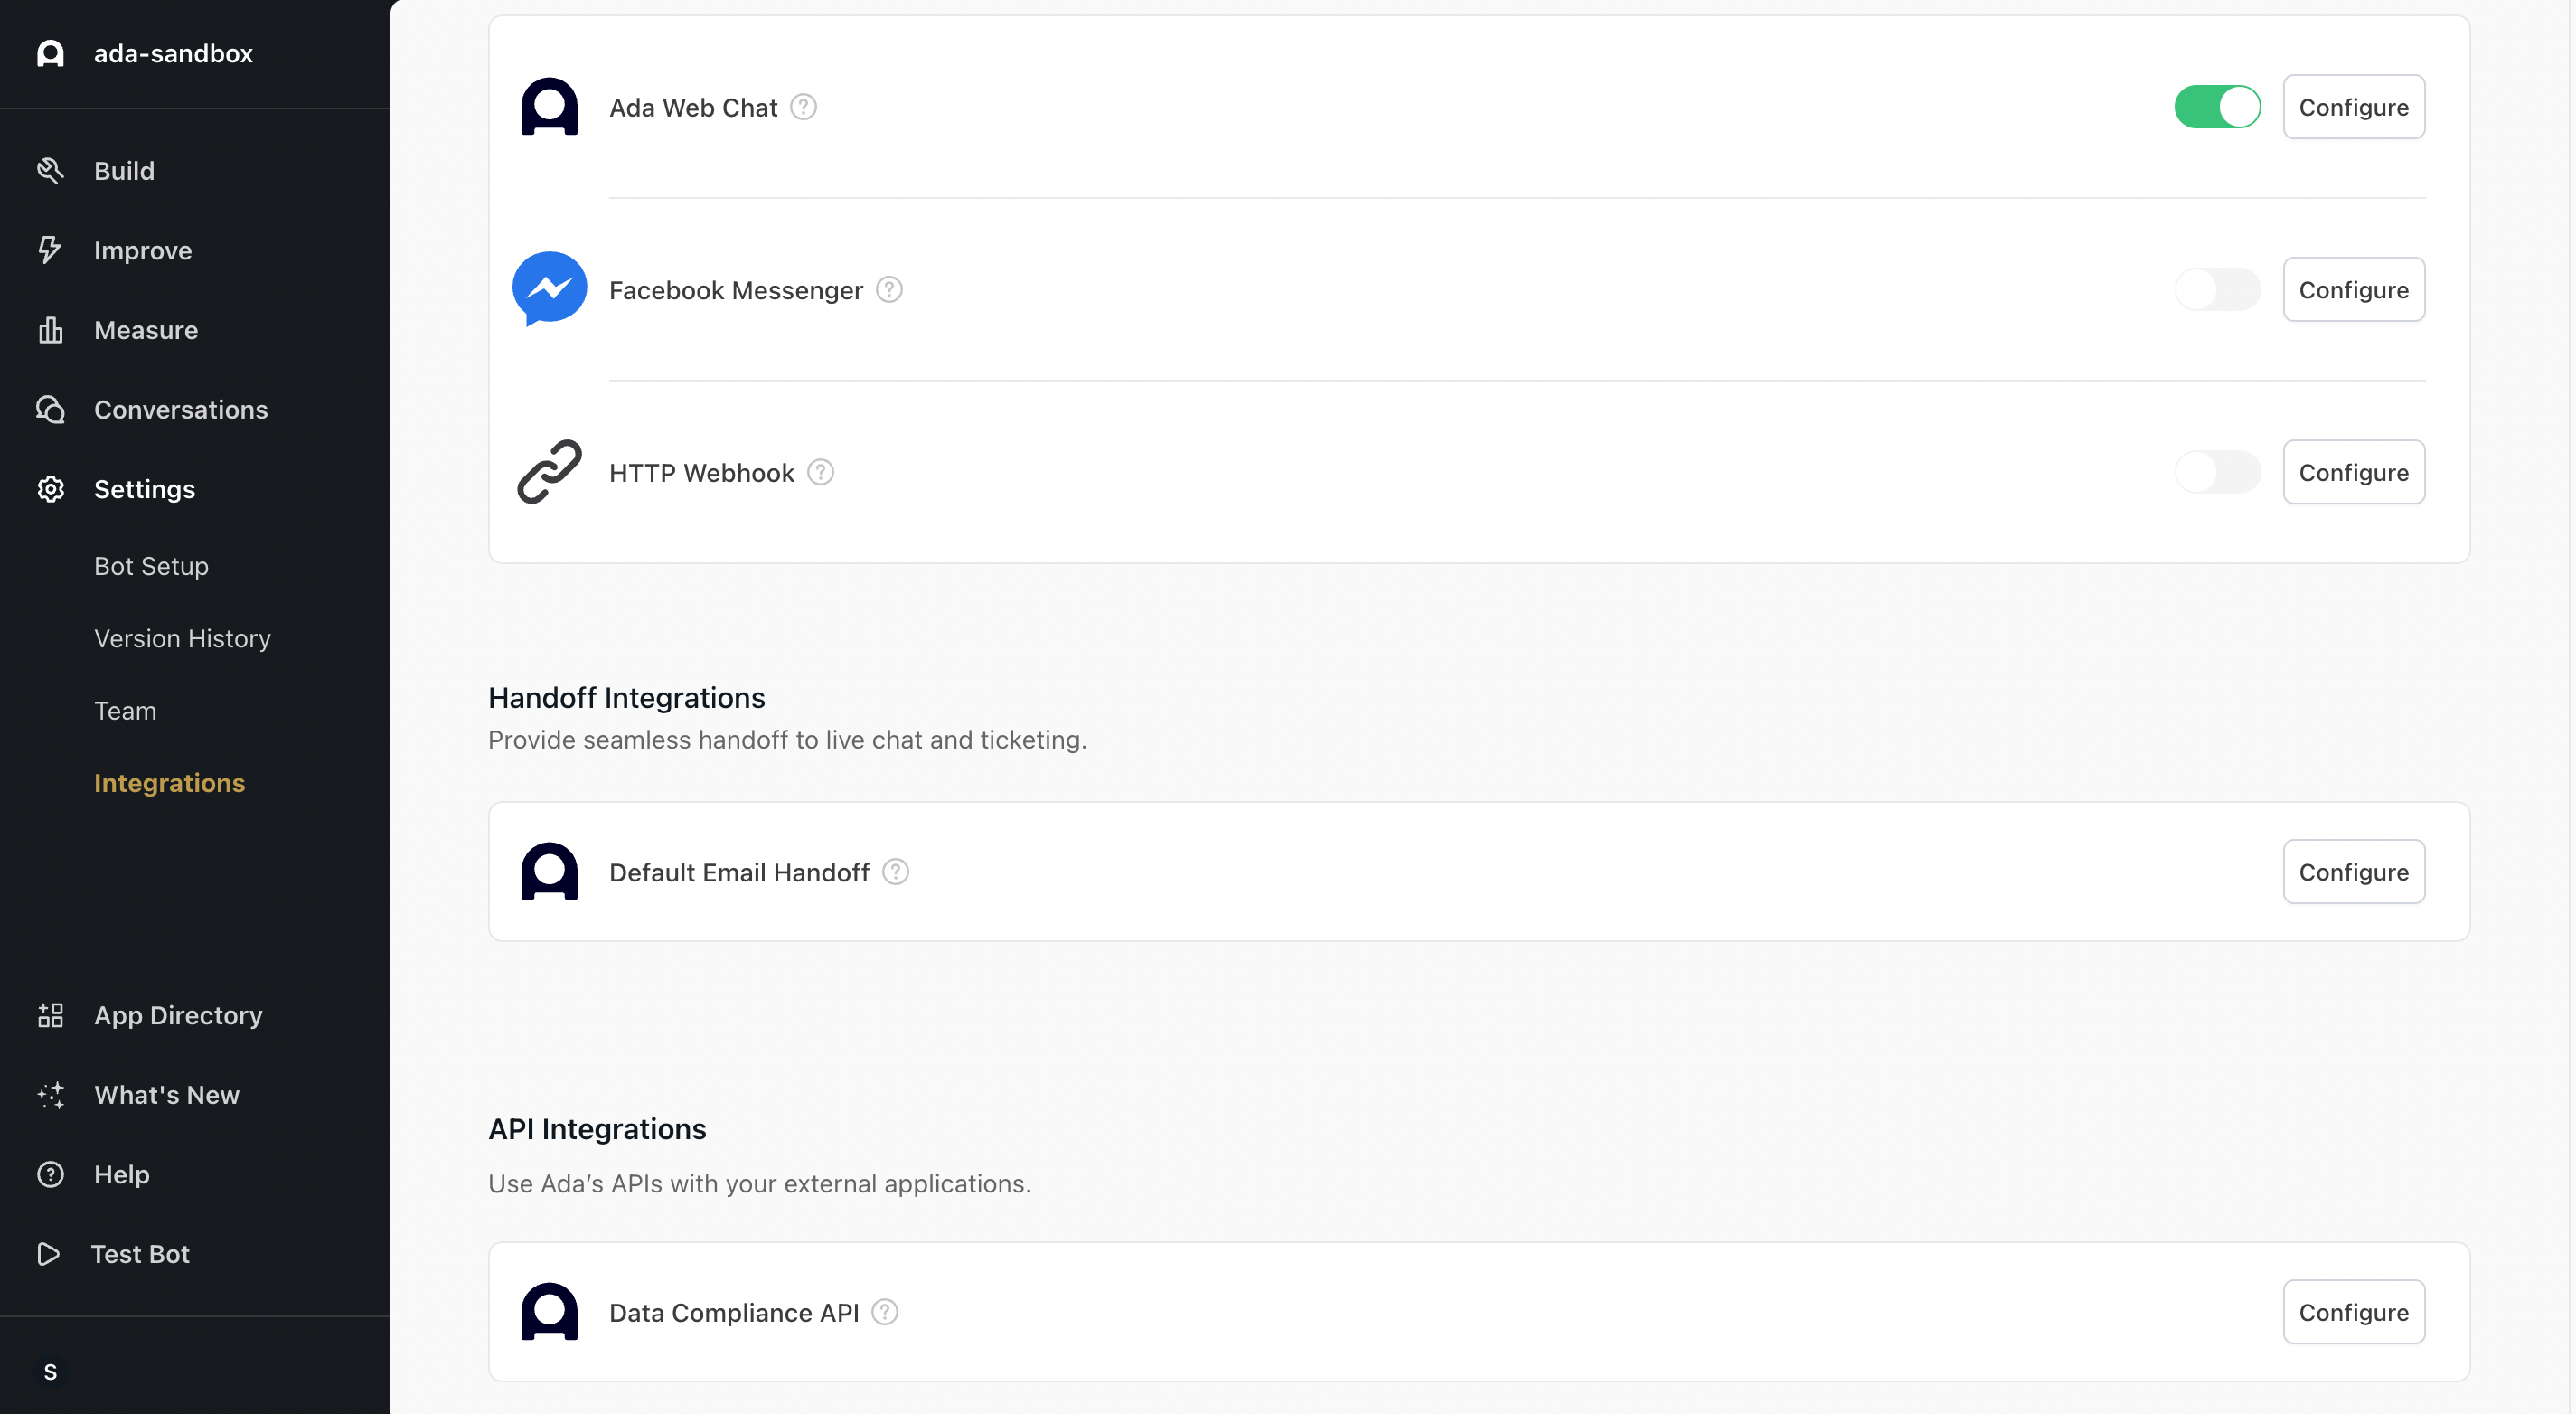
Beside the name of the API, click Configure.
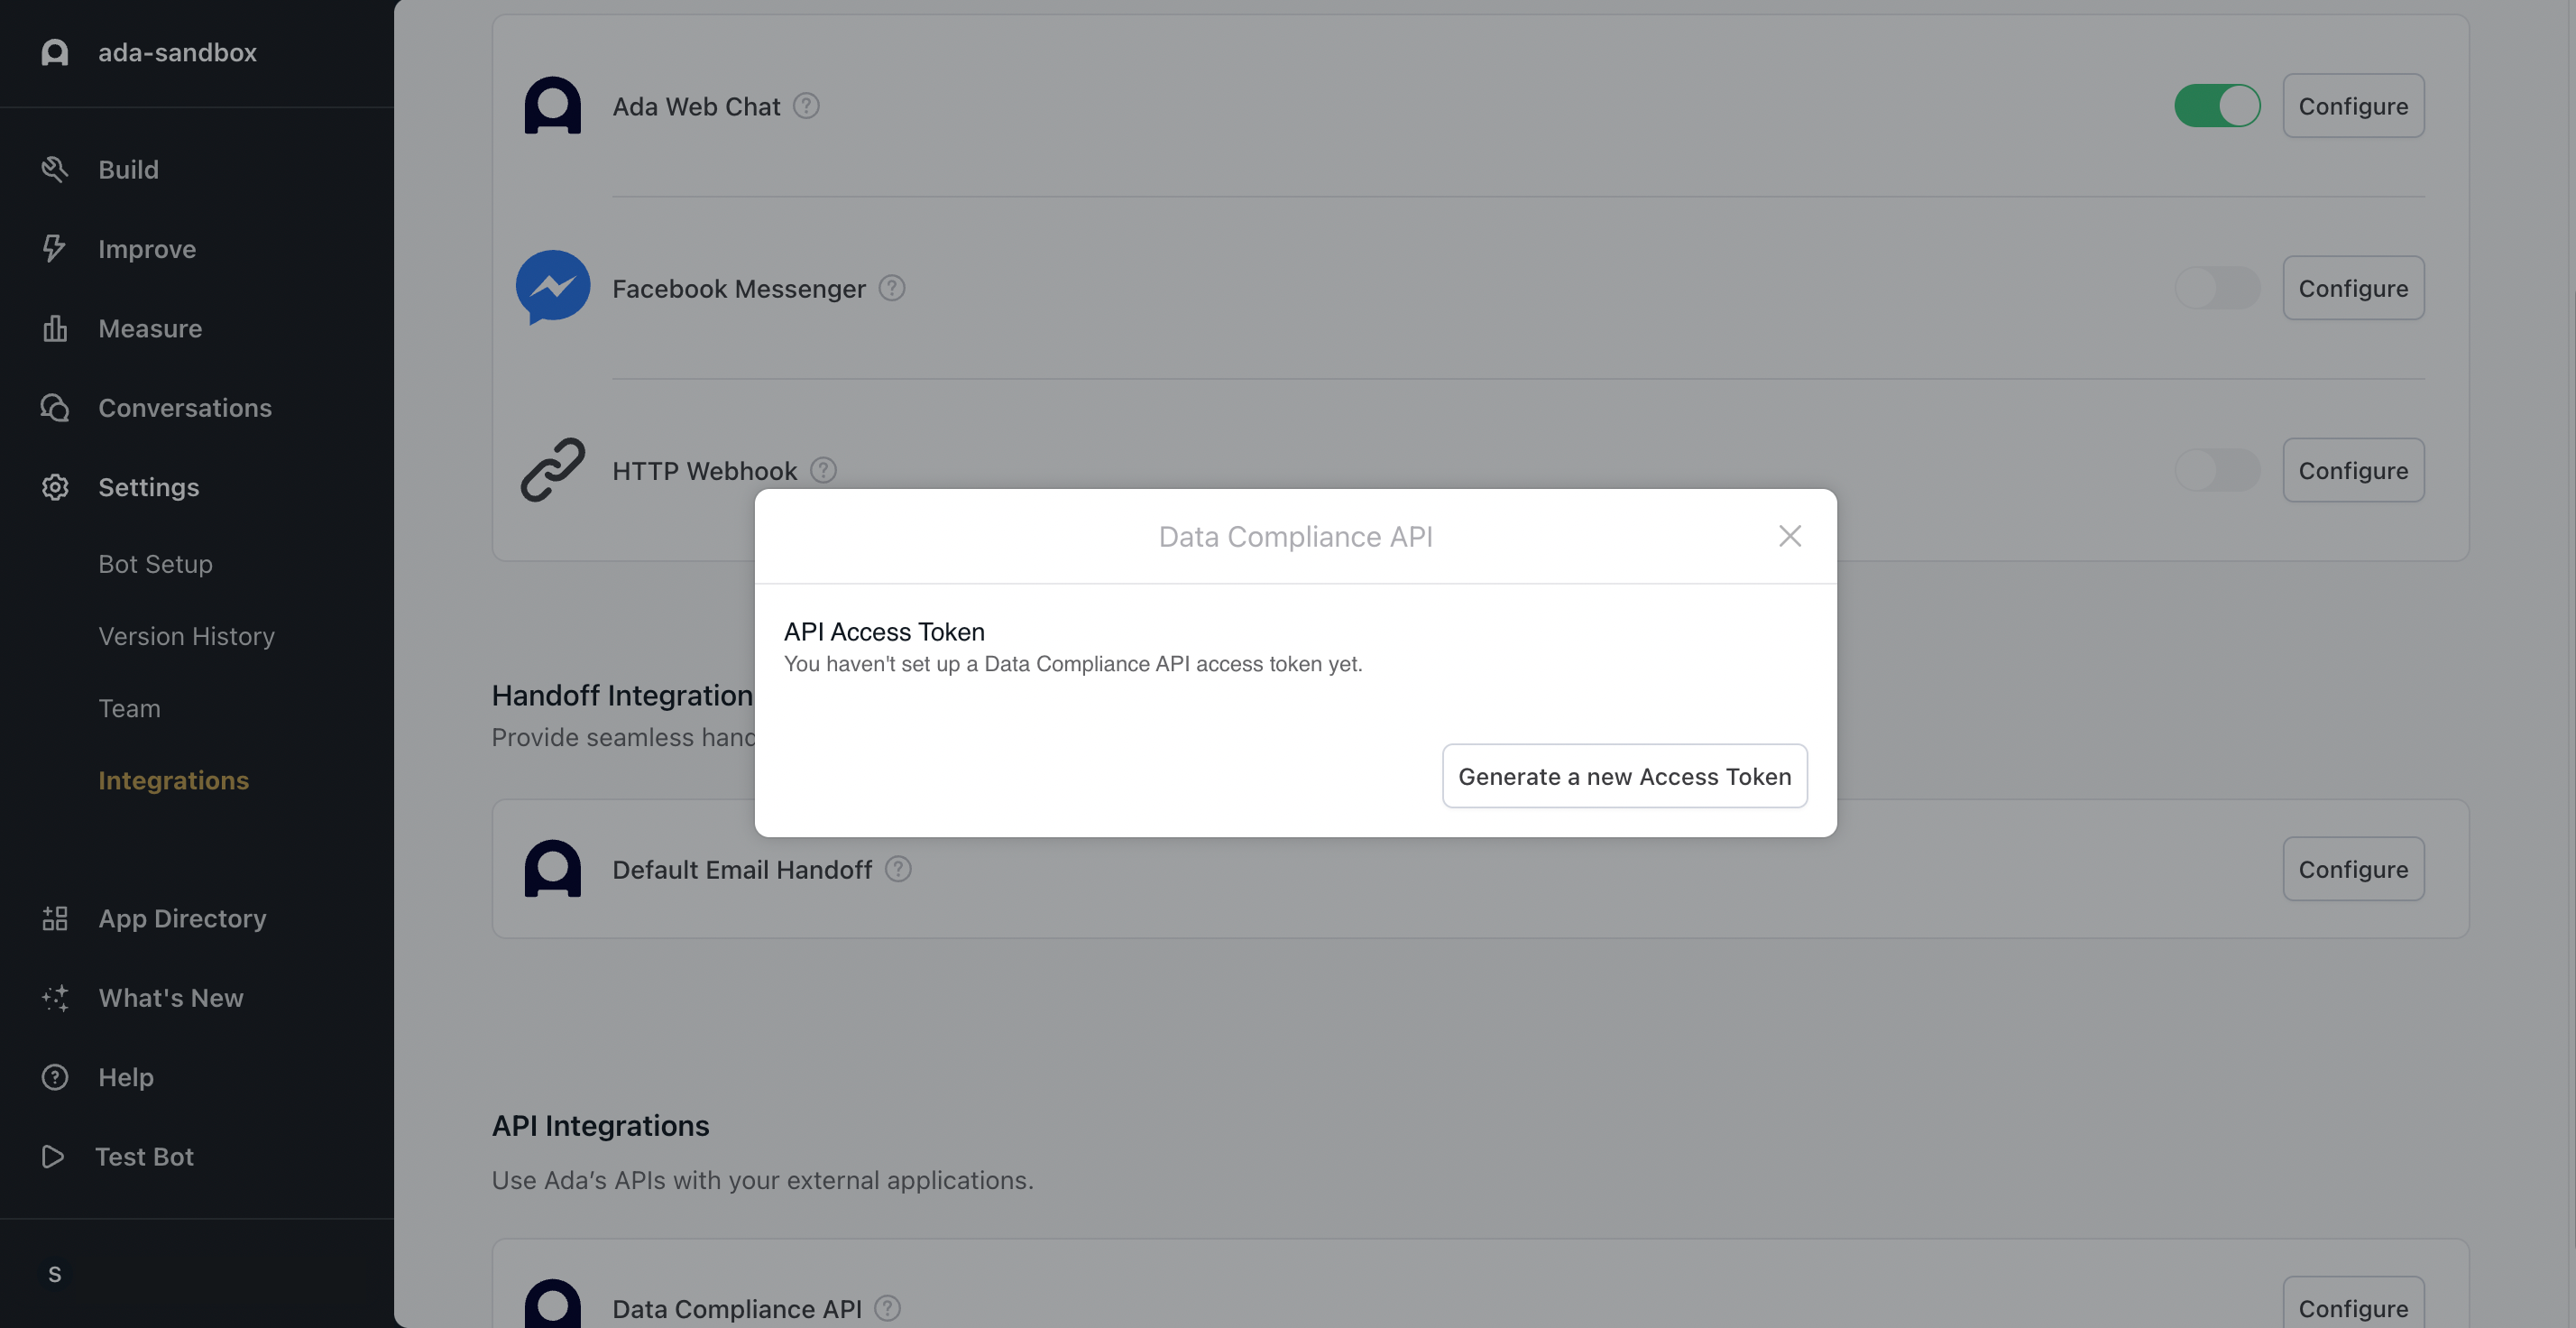
Click Generate a new Access Token.
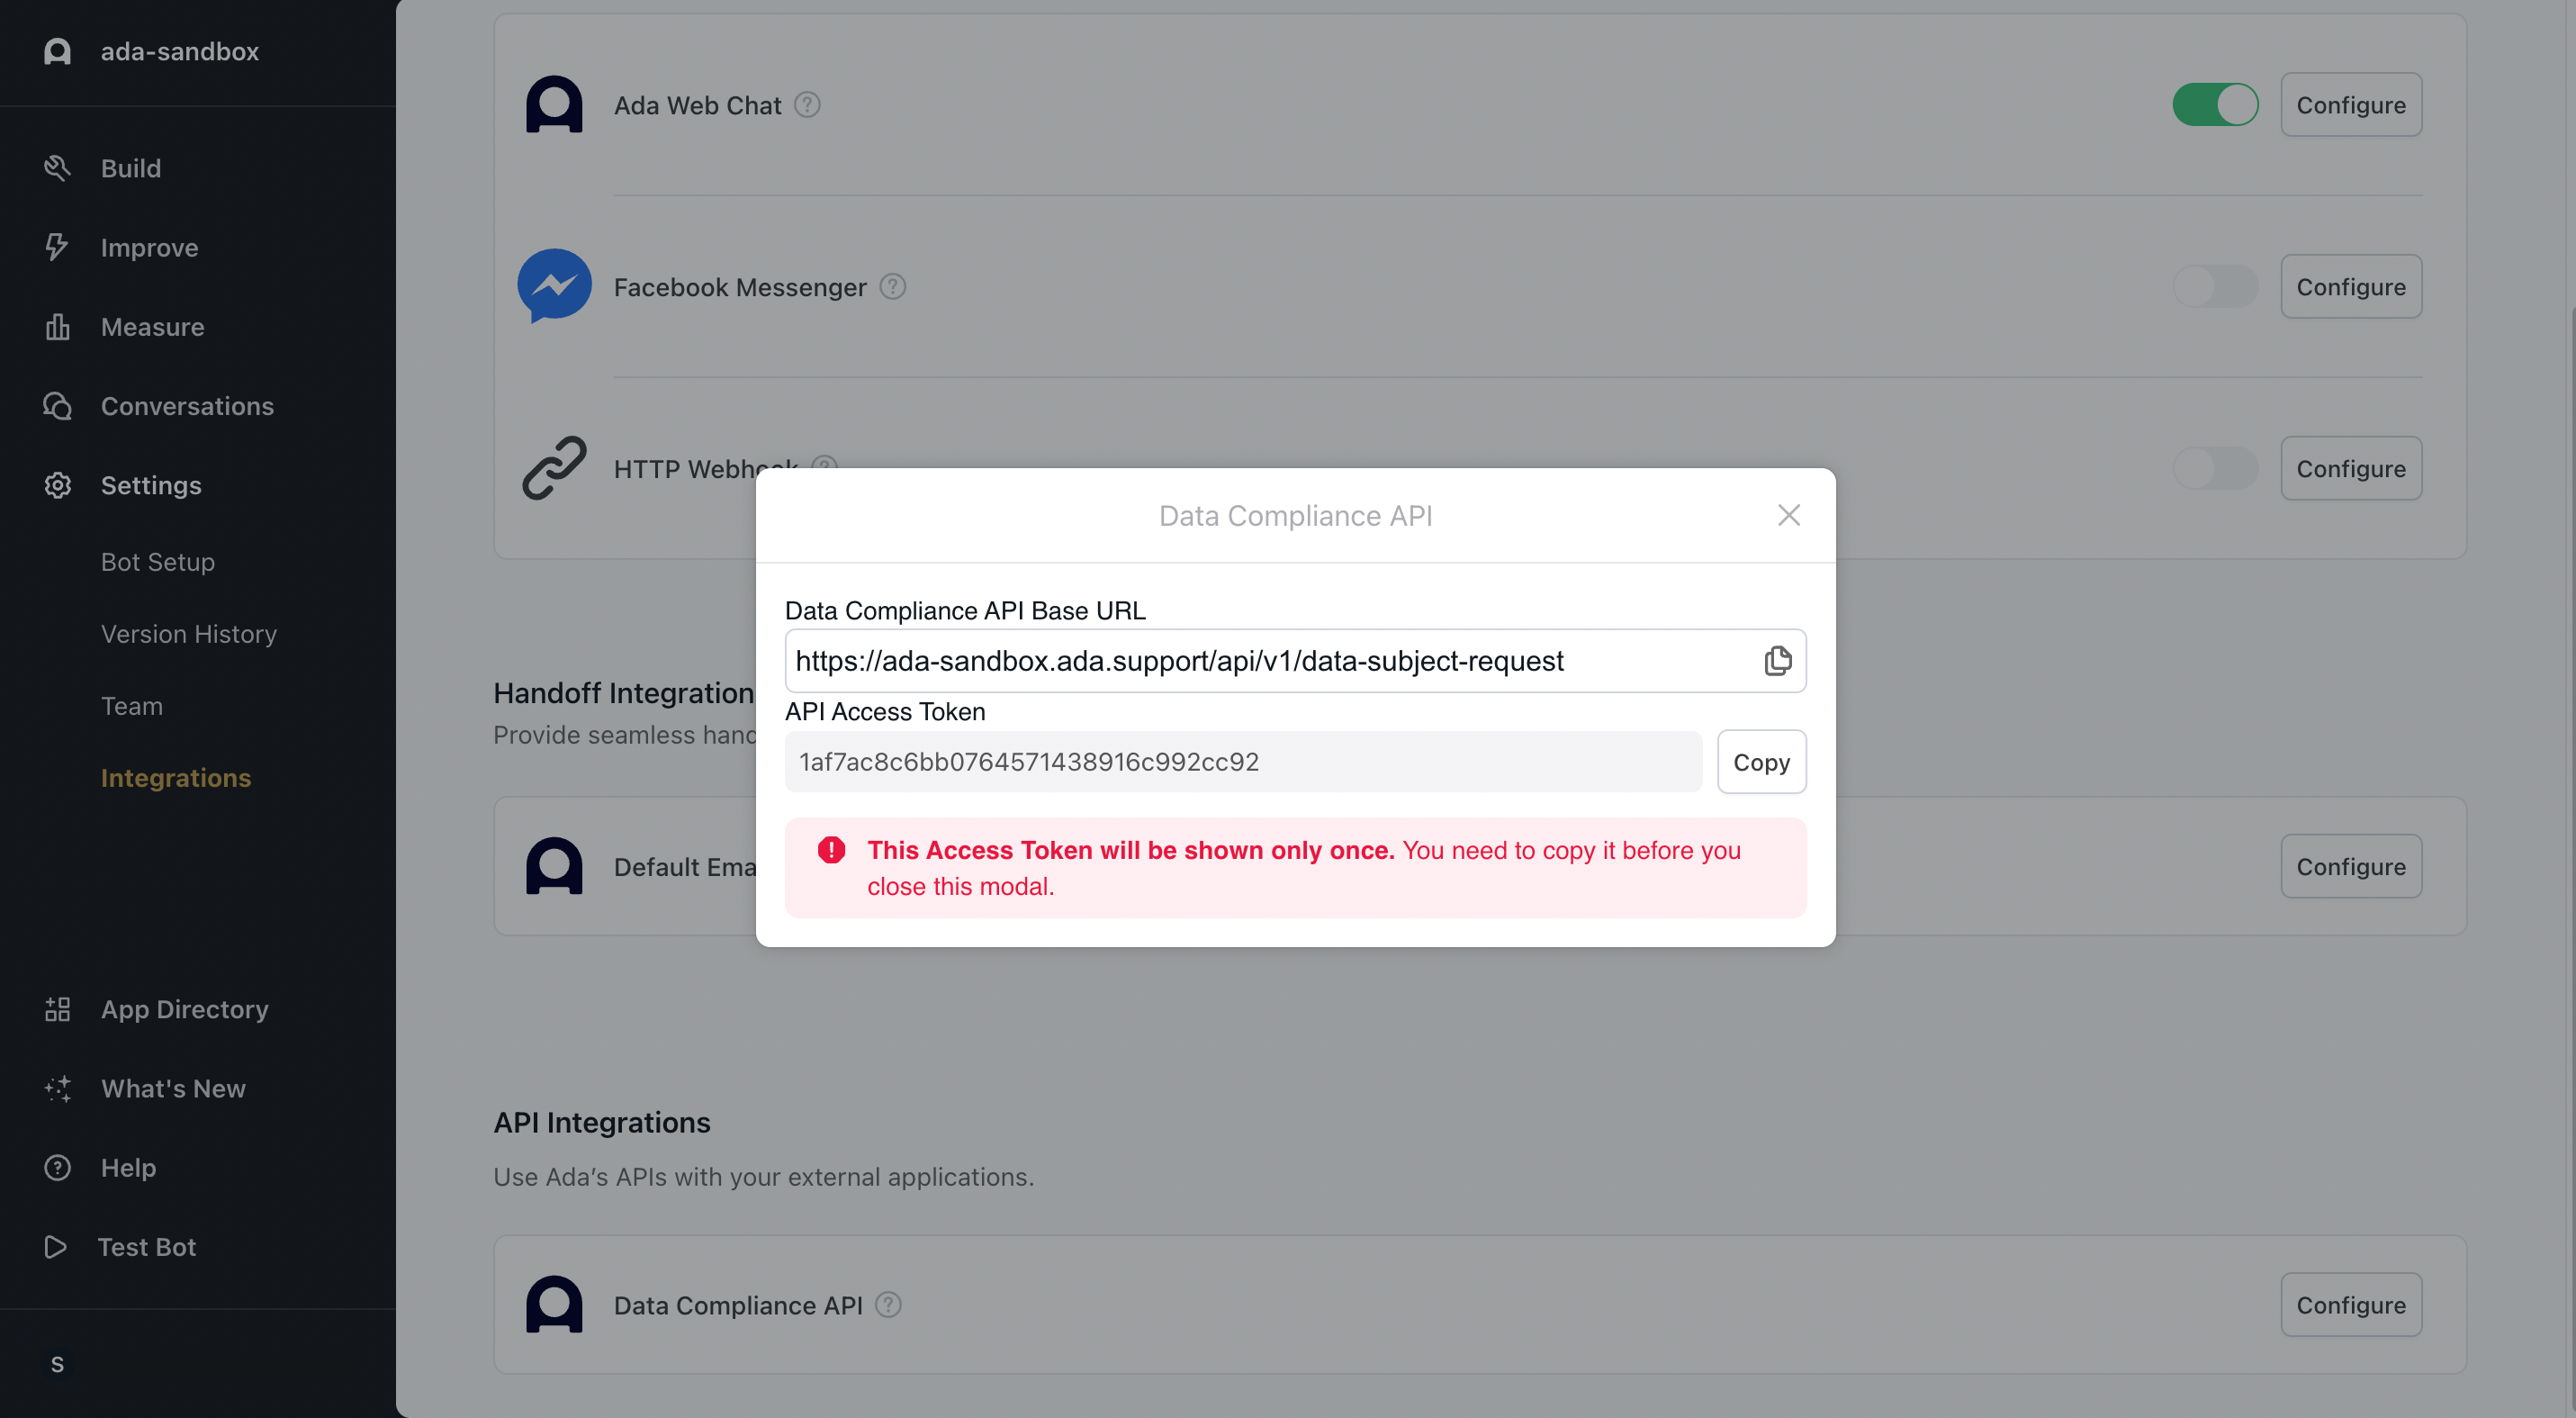
Copy the API Access Token. Keep it in a safe place, as you won’t be able to access it again.
If you misplace your token, click the Generate a new Access Token button to get a new one. When you do this, it invalidates the previous token. Please note that for authentication, ADA uses a bearer token.
ADA Integration with NPM
Retrieve Data from ADA
With your ADA API key in hand, you can now access to the message data endpoint from ADA. This data can include messages, user interactions, or any relevant information you wish to analyze with Dashbot. Check out the example code repository we put together here that illustrates example code of how to fetch data from the messages endpoint and format the data to Dashbot's Universal API.
Here's an example using Node.js to make the GET request and retrieve the data from ADA.
const ADA_API_URL_PREFIX = 'ADA_URL_HERE'
const ADA_API_ACCESS_TOKEN = 'ADA_ACCESS_TOKEN_HERE'

/**
 * Fetches messages from the Ada API using the provided access token and URL prefix.  This function will only work with
 * an actual ADA token and url so you will need to sign up for an Ada account to get this to work.
 *
 * @returns {Promise} A promise that resolves with the data from the Ada API or rejects with an error message.
 */
const fetchAdaMessagesFromAdaAPI = async () => {
  const createdSinceTimestamp = new Date(2024, 1, 0) // January 1st, 2024
  const response = await fetch(`${ADA_API_URL_PREFIX}messages?created_since=${createdSinceTimestamp.toISOString()}`, {
    method: 'GET',
    headers: {
      Authorization: `Bearer ${ADA_API_ACCESS_TOKEN}`,
    }
  })

  const res = await response.json()
  if (res.message === 'OK') { // Yay, we got a response!
    return res.data
  } else { // Something went wrong!
    throw new Error("Failed to fetch messages from Ada API!")
  }
}

/**
 * Normally, this would be a fetch request to the Ada API, a database, or some kind of triggered event.  In this case,
 *   we are simply going to return an array of some messages in the ADA format for illustrative purposes.
 *
 * This data is pulled verbatim from the Ada documentation, found here: https://developers.ada.cx/reference/data-export-message-object
 */
const fetchStaticAdaMessages = () => {
  return {
    "data": [
      {
        "_id": "623225807973ea81fb74577f",
        "answer_id": "6216a263c0c9f28ed7a16c1d",
        "answer_title": "Ada Interact > Welcome Message",
        "chatter_id": "6232257fb197d1ff65ea92fe",
        "conversation_id": "62322580b151ff975f1eb495",
        "date_created": "2022-03-16T17:59:28.356000+00:00",
        "link_was_clicked": false,
        "message_data": {
          "_type": "picture",
          "alt_text": "",
          "has_variables": false,
          "pic_url": "https://static.ada.support/images/a76040d4-f431-4956-8984-b7fc3c6a635b.svg",
          "reviewable_message": false
        },
        "recipient": "6232257fb197d1ff65ea92fe",
        "review": 0,
        "sender": "ada"
      },
      {
        "_id": "623225807973ea81fb745780",
        "answer_id": "6216a263c0c9f28ed7a16c1d",
        "answer_title": "Ada Interact > Welcome Message",
        "chatter_id": "6232257fb197d1ff65ea92fe",
        "conversation_id": "62322580b151ff975f1eb495",
        "date_created": "2022-03-16T17:59:28.393000+00:00",
        "link_was_clicked": false,
        "message_data": {
          "_type": "text",
          "body": "👋 Welcome to Ada Interact! ",
          "has_variables": false,
          "reviewable_message": false
        },
        "recipient": "6232257fb197d1ff65ea92fe",
        "review": 0,
        "sender": "ada"
      },
      {
        "_id": "623225807973ea81fb745781",
        "answer_id": "6216a263c0c9f28ed7a16c1d",
        "answer_title": "Ada Interact > Welcome Message",
        "chatter_id": "6232257fb197d1ff65ea92fe",
        "conversation_id": "62322580b151ff975f1eb495",
        "date_created": "2022-03-16T17:59:28.426000+00:00",
        "link_was_clicked": false,
        "message_data": {
          "_type": "text",
          "body": "If you're curious about any of the reports that Mike mentions, click \"Read the reports\" or just type in 'get the reports'. ",
          "has_forced_quick_replies": false,
          "has_variables": false,
          "reviewable_message": false
        },
        "recipient": "6232257fb197d1ff65ea92fe",
        "review": 0,
        "sender": "ada"
      },
      {
        "_id": "623225807973ea81fb745782",
        "answer_id": "6216a263c0c9f28ed7a16c1d",
        "answer_title": "Ada Interact > Welcome Message",
        "chatter_id": "6232257fb197d1ff65ea92fe",
        "conversation_id": "62322580b151ff975f1eb495",
        "date_created": "2022-03-16T17:59:28.455000+00:00",
        "link_was_clicked": false,
        "message_data": {
          "_type": "quick_replies",
          "has_variables": false,
          "is_forced": false,
          "quick_replies": [
            {
              "button_type": "suggestion",
              "label": "Read the reports ",
              "target": "6220f0840fffbae023fa47f0"
            },
            {
              "button_type": "suggestion",
              "label": "Get a demo of our newest features",
              "target": "62312ec34abadc6df54df263"
            },
            {
              "button_type": "suggestion",
              "label": "Need a little pick me up?",
              "target": "6226319838a50cf76ce74553"
            },
            {
              "button_type": "suggestion",
              "label": "Having issues with the stream?",
              "target": "60c8d235b4499cfc9ca3e070"
            }
          ],
          "reviewable_message": false
        },
        "recipient": "6232257fb197d1ff65ea92fe",
        "review": 0,
        "sender": "ada"
      },
      {
        "_id": "623225807973ea81fb745783",
        "answer_id": "None",
        "answer_title": null,
        "chatter_id": "6232257fb197d1ff65ea92fe",
        "conversation_id": "62322580b151ff975f1eb495",
        "date_created": "2022-03-16T17:59:28.521000+00:00",
        "link_was_clicked": false,
        "message_data": {
          "_type": "meta",
          "meta_message_data": {
            "id": "5faeb1a00aeb31f72a40bc36",
            "name": "last_answer_id",
            "new_value": "6216a263c0c9f28ed7a16c1d",
            "old_value": null,
            "scope": "meta"
          },
          "meta_message_type": "variable_change"
        },
        "recipient": "4ab42775-e590-47be-91a4-5cc99e8ae1e0",
        "review": 0,
        "sender": "bot"
      },
      {
        "_id": "623225818120de06333dcb43",
        "answer_id": "None",
        "answer_title": null,
        "chatter_id": "62322579d812c2074257c201",
        "conversation_id": "6232257ab6b44fc68056b82a",
        "date_created": "2022-03-16T17:59:29.305000+00:00",
        "link_was_clicked": false,
        "message_data": {
          "_type": "greeting",
          "external_chat_id": "09897a21-99af-4714-92b7-10990accdc93",
          "reviewable_message": false
        },
        "recipient": "ada",
        "review": 0,
        "sender": "c6e01111-3e69-42d6-9553-97bc69024e90"
      },
      {
        "_id": "623225818120de06333dcb44",
        "answer_id": "6216a263c0c9f28ed7a16c1d",
        "answer_title": "Ada Interact > Welcome Message",
        "chatter_id": "62322579d812c2074257c201",
        "conversation_id": "6232257ab6b44fc68056b82a",
        "date_created": "2022-03-16T17:59:29.453000+00:00",
        "link_was_clicked": false,
        "message_data": {
          "_type": "picture",
          "alt_text": "",
          "has_variables": false,
          "pic_url": "https://static.ada.support/images/a76040d4-f431-4956-8984-b7fc3c6a635b.svg",
          "reviewable_message": false
        },
        "recipient": "62322579d812c2074257c201",
        "review": 0,
        "sender": "ada"
      }
    ]
  }
}

export { fetchStaticAdaMessages, fetchAdaMessagesFromAdaAPI }
Post Data to Dashbot
After successfully retrieving data from ADA, the next step is to format this data according to Dashbot's specifications and send it to Dashbot's Universal API.
import { fetchAdaMessagesFromAdaAPI, fetchStaticAdaMessages } from "./fetch-ada-data.js";
/** This is pulling the data retrievd in the above section**/

const DASHBOT_API_KEY = 'API_KEY_HERE'
const TRACKER_URL_PREFIX = 'https://tracker.dashbot.io/track?platform=universal&v=10.1.1-rest'

/**
 * Main method for this example program.
 *
 * -- Fetches Ada messages
 * -- Converts to Dashbot's Universal format
 * -- Sends to Dashbot via their message tracker endpoint for data ingestion
 */
const handleAdaToUniveralConversion = async (shouldUseExampleData) => {
  // Fetch messages from Ada
  let adaMessages
  if (shouldUseExampleData) {
    adaMessages = fetchStaticAdaMessages()
  } else {
    adaMessages = await fetchAdaMessagesFromAdaAPI()
  }
  const messageDataArray = adaMessages.data

  // Convert to the Dashbot Univeral format
  const universalData = messageDataArray.map((adaMessage) => {
    switch (adaMessage.message_data._type) {
      case 'text':
        return {
          incoming: adaMessage.sender === 'ada' || adaMessage.sender === 'bot',
          dashbot_timestamp: new Date(adaMessage.date_created).getTime(),
          text: adaMessage.message_data.body,
          conversationId: adaMessage.conversation_id,
          userId: adaMessage.chatter_id,
          platformJson: { ...adaMessage } // PlatformJson is a space for any additional data you want to send to Dashbot
        }
        break;
      default: // Note that events, pictures, and other attachments and types are supported.  Please see the Dashbot API documentation for more information.
        console.trace("Unsupported message type: " + adaMessage.message_data._type)
        break;
    }
  }).filter((message) => message !== undefined)

  // The conversion is done.  This is simply illustrative of how to get this over to the Dashbot system.
  await sendToDashbot(universalData)
}

/**
 * Sends data to Dashbot via the message tracker endpoint.  Note that at this point, you could also write this array to
 * a file in JSONL format and upload via the file upload functionality.
 *
 * @param universalData Data translated to the universal format
 */
const sendToDashbot = async (universalData) => {
  for (const message of universalData) {
    const data = JSON.stringify(message)
    const url =`${TRACKER_URL_PREFIX}&apiKey=${DASHBOT_API_KEY}&type=${message.incoming ? 'incoming' : 'outgoing'}`

    const res = await fetch(url, {
      method: 'POST',
      headers: {
        'accept': 'application/json',
        'Content-Type': 'application/json',
      },
      body: data
    })

    if (res.status === 200) {
      console.trace("Yay!  We sent a message to Dashbot!")
    } else {
      console.error("Oh no!  Something went wrong.  Check the configs and possible contact support.")
    }
  }
}

// Change the parameter to false if you want to test with live data.  You will need to fill in your own Ada API information.
await handleAdaToUniveralConversion(true)
Once data is posted successfully, you will want to set up a live integration according to your own infrastructure. Refer to the "Creating a Live Integration" guide for more information!