
Kore.ai offers an AI-powered conversational platform that empowers enterprises to build and deploy intelligent virtual assistants for seamless customer interactions across various channels.
Welcome to the Kore.ai documentation for Dashbot! Integrating Dashbot into your Kore.ai application is quick and easy.
Obtain Kore.ai API Key
To interact with Kore.ai APIs, you first need an API key. This key is essential for authenticating and authorizing your requests to Kore.ai. See here for more details on generating your Kore.ai API key and authentication tokens.
Access Authorization Profiles
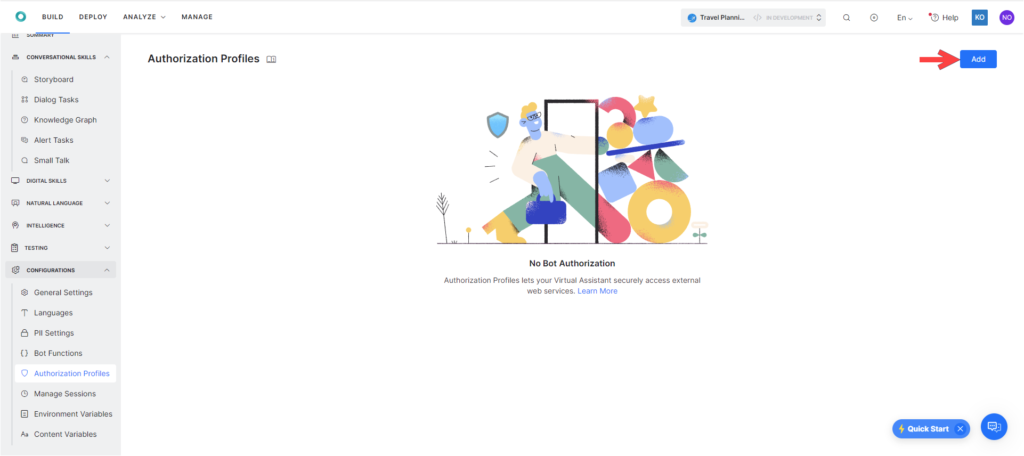
Open the assistant for which you want to configure an Authorization profile.
Select the Build tab from the top menu.
From the left menus, click Configurations > Authorization Profile
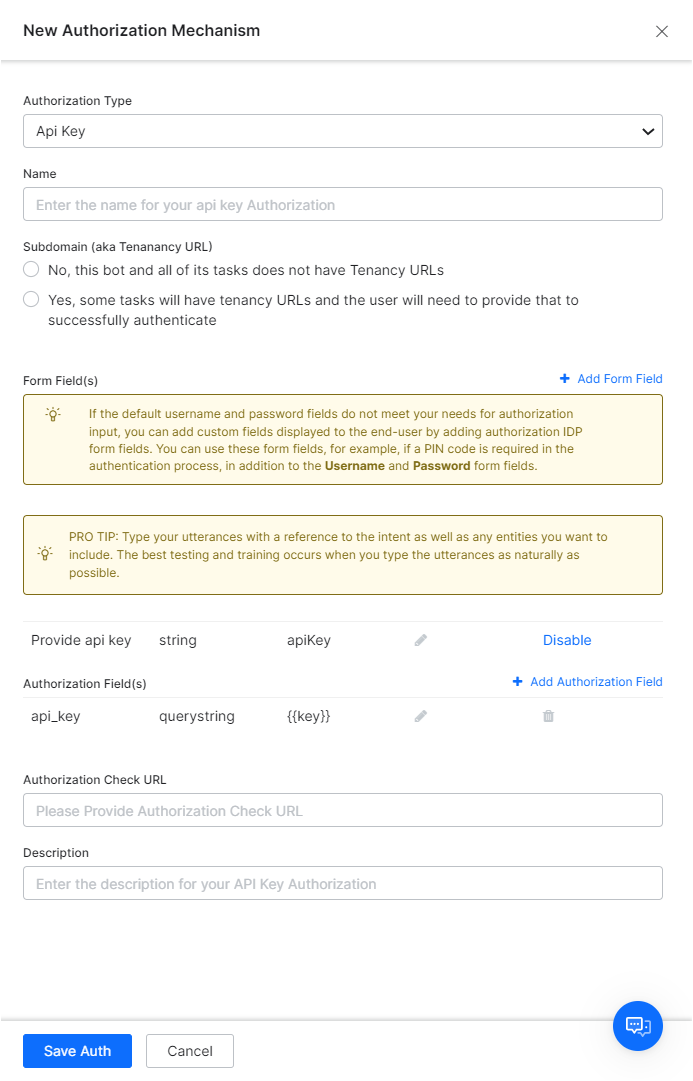
Click Add to open the New Authorization Mechanism dialog.
API Key Generation: In the Authorization Type drop-down list, select Api Key.
Retrieve Data from Kore.ai
With your API key, you can now make a GET request to retrieve conversation history or other data from Kore.ai. You will want to use Kore's Conversation History API.
Example GET Request:
Kore.ai has two versions of their conversation endpoint:
Version 1:
https\://{{host}}/api/public/bot/{{botId}}/getMessages?userId={{userId}}&limit=10&dateFrom=2023-05-20&dateTo=2023-05-25
Version 2:
https\://{{host}}/api/public/bot/{{botId}}/getMessagesV2?userId={{userId}}&limit=10&dateFrom=2023-05-20&dateTo=2023-05-25
Here is an example of the GET request for the respective versions of the endpoint:
Version 1:

curl -X GET \
'https://{{host}}/api/public/bot/{{botId}}/getMessages?userId={{userId}}&limit=10&dateFrom=2023-05-20&dateTo=2023-05-25' \
--header 'auth: {{YOUR_JWT_ACCESS_TOKEN}}'


Version 2:

curl -X GET --compressed --location \
'https://{{host}}/api/public/bot/{{botId}}/getMessagesV2?userId={{userId}}&limit=10&dateFrom=2023-05-20&dateTo=2023-05-25' \
--header 'accept-encoding: gzip, deflate, br' \
--header 'Content-Type: application/json' \
--header 'auth: {{YOUR_JWT_ACCESS_TOKEN}}'
Ensure you replace 'YOUR_KORE.AI_API_KEY' and 'YOUR_BOT_ID' with your actual Kore.ai API key and Bot ID. Be sure to adjust the date fields in the endpoint URL as well.
Below is what a successful response for the endpoint from Kore.
{
"total": 1,
"moreAvailable": false,
"icon": "https://dlnwzkim0wron.cloudfront.net/f-87c47629-7exxxxxxxx-a807ccfb1cf0.png",
"messages": [
{
"_id": "ms-fee996b9-0485-55a3-bf42-417c1272aff4",
            "channels": [
                {
                    "type": "rtm",
                    "channelUId": “[email protected]"
                }
            ],
            "type": "incoming",
            "status": "received",
            "createdBy": "u-1bc0993f-e0d6-5589-973d-6fe2663de2d4",
            "lmodifiedBy": "u-1bc0993f-e0d6-5589-973d-6fe2663de2d4",
            "createdOn": "2023-07-18T09:46:46.925Z",
            "lmodifiedOn": "2023-07-18T09:46:46.925Z",
            "botId": "st-369f9021-2a85-5b32-9005-63139d57c2e5",
            "orgId": "o-f4b49c0a-f027-57bf-aef0-b68ad9b51ee2",
            "accountId": "6461f97ed43763474b34e56e",
            "isBB": 1,
            "ms": 1,
            "chnl": "rtm",
            "isD": 1,
            "components": [
                {
                    "_id": "cp-ae11791d-118f-53f1-8905-9bc9f03fdece",
                    "cT": "text",
                    "data": {
                        "text": "hi"
                    },
                    "thumbnails": []
                }
            ],
            "timestampValue": 1689673606939,
            "__v": 0,
            "lang": "en",
            "sT": 1,
            "sessionId": "64b65f87277b464507f778c0",
            "cluster_id": "Others",
            "resourceid": "messagestore",
            "tags": {
                "messageTags": [],
                "userTags": [
                    {
                        "value": "Alan",
                        "name": "Alan Walker"
                    }
                ],
                "sessionTags": [],
                "altText": []
            },
            "traceId": "5371b61d-b1bb-4432-80de-7430772b0cfb"
        },
        {
            "_id": "ms-5436a303-0d8c-58e8-8ad3-33bf5bcefcb7",
            "channels": [
                {
                    "type": "rtm",
                    "channelUId": “[email protected]"
                }
            ],
            "type": "outgoing",
            "status": "pending",
            "createdOn": "2023-07-18T09:46:47.497Z",
            "lmodifiedOn": "2023-07-18T09:46:47.497Z",
            "createdBy": "u-1bc0993f-e0d6-5589-973d-6fe2663de2d4",
            "components": [
                {
                    "_id": "cp-c035b2f4-10f2-5294-b655-c2d6273e0154",
                    "cT": "text",
                    "data": {
                        "text": "Hey :)"
                    },
                    "thumbnails": []
                }
            ],
            "botId": "st-369f9021-2a85-5b32-9005-63139d57c2e5",
            "orgId": "o-f4b49c0a-f027-57bf-aef0-b68ad9b51ee2",
            "accountId": "6461f97ed43763474b34e56e",
            "tN": "WebAlert",
            "isBB": 1,
            "ms": 1,
            "chnl": "rtm",
            "isD": 1,
            "lang": "en",
            "timestampValue": 1689673607507,
            "__v": 0,
            "sT": 1,
            "sessionId": "64b65f87277b464507f778c0",
            "resourceid": "messagestore",
            "tags": {
                "messageTags": [],
                "userTags": [
                    {
                        "value": "Alan",
                        "name": "Alan Walker"
                    }
                ],
                "sessionTags": [],
                "altText": []
            }
        },
POST responses to Dashbot
When you receive a message or support ticket post the data to the following endpoint:
https://tracker.dashbot.io/track?platform=universal&v=10.1.1-rest&type=incoming&apiKey=API_KEY_HERE
Make sure to set the ‘Content-Type’ header to ‘application/json’ and to replace API_KEY_HERE with your api key.
You must send the data with the following fields:
- text – string – (required)
- userId – string – (required) – should be the SAME userId for both incoming and outgoing messages this is NOT the bot’s user ID
To review all optional fields see our API reference.
The data to POST should pass the following data:
{
  "text": "Hi, bot",
  "userId": "+14155551234",
  "platformJson": {
    "whateverJson": "any JSON specific to your platform can be stored here"
  }
}
Sample cURL
curl -X POST -H "Content-Type: application/json"
     -d '{"text":"Hi, bot","userId":"+14155551234","platformJson":{"whateverJson":"any JSON specific to your platform can be stored here"}}'
     'https://tracker.dashbot.io/track?platform=sms&v=11.1.0-rest&type=incoming&apiKey=API_KEY'
Notice, you must replace the placeholder API_KEY_HERE above with your api key.